Difference between revisions of "Citizen CLP621"
| (15 intermediate revisions by 2 users not shown) | |||
| Line 1: | Line 1: | ||
[[Image:clp621.jpg|right]] | [[Image:clp621.jpg|right]] | ||
==Product Manual== | ==Product Manual== | ||
| − | The product manual outlines printer specific issues, and can be viewed [File:CLP621 Manual.pdf|here] in PDF format. | + | The product manual outlines printer specific issues, and can be viewed [[File:CLP621 Manual.pdf|here]] in PDF format. |
| + | |||
| + | CLS621 User Manual is available here: [[File:Cls621-631uman.pdf]] | ||
===Drivers and Utilities=== | ===Drivers and Utilities=== | ||
Up to date Drivers and Utilities can be found at the [http://www.citizen-systems.com/support/index.aspx Citizen Support Site] | Up to date Drivers and Utilities can be found at the [http://www.citizen-systems.com/support/index.aspx Citizen Support Site] | ||
| − | CLP Series Windows Driver Citizen_7.1.5_M-2 [File:Citizen_7.1.5_M-2.exe|Download] | + | CLP Series Windows Driver Citizen_7.1.5_M-2 [[File:Citizen_7.1.5_M-2.exe|Download]] |
| − | VuePrint Utility [File: | + | VuePrint Utility [[File:Vue Print Utility Installer.exe|Download]] |
| + | |||
| + | ===Print Code=== | ||
| + | Print code for the printer is generated using the language described by the [[http://www.citizen-systems.com/sites/default/files/CL-S%20Command%20Reference%202.01.pdf|Citizen Command Reference Manual]] | ||
| + | Printing origin is at the bottom left of label, all measurements are made from here. Units are 0.01 inch or 0.1 mm. | ||
| + | |||
| + | Can set n for inch or m for millimeter positioning, but looks as though neither are specified here. | ||
| + | |||
| + | L | ||
| + | |||
| + | ---Specifying printing contents setting start | ||
| + | |||
| + | D11 | ||
| + | |||
| + | ---Set Pixel Size | ||
| + | |||
| + | PI | ||
| + | |||
| + | --set print speed | ||
| + | |||
| + | SI | ||
| + | |||
| + | --set paper feed speed | ||
| + | |||
| + | H20 | ||
| + | |||
| + | --set print density (thermal transfer amount) | ||
| + | |||
| + | 1 2 1 1 000 0026 0010 STYLENUM | ||
| + | |||
| + | ---system font 2 set in characters 2/5/6/7 (this font is 18 dots high by 10 dots wide by 2 dots space at 203 DPI and 27 dots high by 14 dots wide by 4 dots space for 300 DPI | ||
| + | |||
| + | 1 e 3 1 015 0013 0010 BEXC00014 | ||
| + | |||
| + | ---code 128 barcode font set in characters 2/5/6/7 | ||
| + | |||
| + | ---digit 1 is printing angle (set to 1 for horizontal) | ||
| + | |||
| + | ---digit 2 is bar code selection (E for code128 B) | ||
| + | |||
| + | ---digit 3 is wide bar width (set to 3) | ||
| + | |||
| + | ---digit 4 is narrow bar width (set to 1) | ||
| + | |||
| + | ---digit 5/6/7 is bar code height (set to 015) | ||
| + | |||
| + | ---digit 8/9/10/11 is row address, distance upward from origin (set to 0013) | ||
| + | |||
| + | ---digit 12/13/14/15 is column address, distance rightward from origin (set to 0010) | ||
| + | |||
| + | 1 2 1 1 000 0003 0010EXC00014 | ||
| + | |||
| + | 1 2 1 1 000 0031 0096DESCRIPTION1 | ||
| + | |||
| + | ---digit 1 is printing angle (set to 1 for horizontal) | ||
| + | |||
| + | ---digit 2 is font selection (set to font 2) | ||
| + | |||
| + | ---digit 3 is horizontal direction expansion rate (set to 1) | ||
| + | |||
| + | ---digit 4 is vertical direction expansion rate (set to 1) | ||
| + | |||
| + | ---digit 5/6/7 is expansion font selection (set to 000) | ||
| + | |||
| + | ---digit 8/9/10/11 is distance upward from (set to 0031) | ||
| + | |||
| + | --digit 12/13/14/15 is distance rightward from (set to 0096) | ||
| + | |||
| + | 1 2 1 1 000 0021 0096 DESCRIPTION2 | ||
| + | |||
| + | 1 2 1 1 000 0011 0096 DESCRIPTION3 | ||
| + | |||
| + | 1 2 1 1 000 0001 0096 $10,000.00 | ||
| + | |||
| + | Q0001 | ||
| + | |||
| + | E | ||
| + | |||
| + | ---End label format mode and print label | ||
| + | |||
====Installation==== | ====Installation==== | ||
| − | + | 1 Download the drivers here [[File:Citizen_7.1.5_M-2.exe]] and Save them to your desktop | |
| − | + | ||
| − | + | 2 Double click Citizen_7.1.5_M-2.exe and run the Installation Wizard | |
| − | [[Image:Citizen1.png | + | |
| − | + | 3 Accept the License Agreement and click Next | |
| − | [[Image:Citizen2.png | + | |
| − | + | [[Image:Citizen1.png]] | |
| − | [[Image:Citizen3.png | + | |
| + | 4 Accept the Installation Directory (C:\Seagull by default) and click Next | ||
| + | |||
| + | [[Image:Citizen2.png]] | ||
| + | |||
| + | 5 Click Finish to unpack the driver and launch the Setup Wizard | ||
| + | |||
| + | [[Image:Citizen3.png]] | ||
| + | |||
** Installation Instructions are displayed, use these as further reference | ** Installation Instructions are displayed, use these as further reference | ||
| − | + | ||
| − | [[Image:Citizen4.png | + | 6 In the Setup Wizard, choose to Install a New Printer |
| − | + | ||
| − | [[Image:Citizen5.png | + | [[Image:Citizen4.png]] |
| − | + | ||
| − | [[Image:Citizen6.png | + | 7 Choose your printer model (CLP621 in this case) |
| − | + | ||
| − | [[Image:Citizen7.png | + | [[Image:Citizen5.png]] |
| − | + | ||
| − | [[Image:Citizen8.png | + | 8 Choose the port you are installing on |
| − | + | ||
| − | [[Image:Citizen9.png | + | [[Image:Citizen6.png]] |
| + | |||
| + | 9 Choose to share the printer as ''CitizenCLP621'' | ||
| + | |||
| + | [[Image:Citizen7.png]] | ||
| + | |||
| + | 10 Review the settings and click Finish to install | ||
| + | |||
| + | [[Image:Citizen8.png]] | ||
| + | |||
| + | 11 When the installation is complete, close the wizard | ||
| + | |||
| + | [[Image:Citizen9.png]] | ||
| + | |||
| + | ===CLS621=== | ||
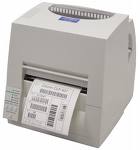
| + | The CLP621 has been replaced by the CLS621. The new model is capable of emulating various Datamax and Zebra languages, so is compatible with the Citzen tag printing in Executive provided it is properly configured to print the right language. | ||
| + | |||
| + | Factory defaults appear to set it to Zebra, so new CLS621 models may need to go through the following procedure: | ||
| + | |||
| + | 1 Turn Power Off | ||
| + | |||
| + | 2 Press Mode/Repeat key and Power On | ||
| + | |||
| + | 3 Do you want to reset this printer to factory settings? Yes (Pause) | ||
| + | |||
| + | 4 Do you want to print current menu settings? No (Stop) | ||
| + | |||
| + | 5 Do you want to change the menu settings? Yes (Pause) | ||
| + | |||
| + | 6 Do you want to change Global Config Menu? No (Stop) | ||
| + | |||
| + | 7 Do you want to change Page Setup Menu Items? No (Stop) | ||
| + | |||
| + | 8 Do you want to change System Setup Menu Items? Yes (Pause) | ||
| + | |||
| + | 9 For this section of questions, select Pause for the first 9 or so, until you come to Emulation Select (after Control Code). Choose Change Value (Stop) | ||
| + | |||
| + | 10 First should be DMI, choose Next Item (Stop) | ||
| + | |||
| + | 11 Next should be DM4, choose Select (Pause) | ||
| + | |||
| + | 12 It should now restart the printer in Datamax DM4 emulation mode. This should reinstall the driver on Win7 computers (especially if you've already installed the main Citizen CLS621 driver (not the C or Z variation) | ||
| + | |||
| + | 13 Test printing and ensure it does not put on the warning light when sending print jobs anymore. Contact support if troubles persist. | ||
==Troubleshooting== | ==Troubleshooting== | ||
===Alignment Problems=== | ===Alignment Problems=== | ||
====Label Gap Sensor==== | ====Label Gap Sensor==== | ||
| − | The Label Gap Sensor is used to determine the length of each tag, and controls the advancement of tags. If printing or using the Form Feed button causes many tags to advance and an error signal is given, there may be an issue with the Label Gap Sensor alignment. To align the gap sensor, see page 40 of the [CLP621 Manual.pdf|CLP621 Manual] or the [http://www.citizen.co.uk/support/info/bc_faq_jm-calibrate.htm#callabel Citizen FAQ Site]. | + | The Label Gap Sensor is used to determine the length of each tag, and controls the advancement of tags. If printing or using the Form Feed button causes many tags to advance and an error signal is given, there may be an issue with the Label Gap Sensor alignment. To align the gap sensor, see page 40 of the [[File:CLP621 Manual.pdf|CLP621 Manual]] or the [http://www.citizen.co.uk/support/info/bc_faq_jm-calibrate.htm#callabel Citizen FAQ Site]. |
| + | |||
| + | [[Category:Hardware]] | ||
Latest revision as of 02:19, 27 September 2017
Contents
Product Manual
The product manual outlines printer specific issues, and can be viewed File:CLP621 Manual.pdf in PDF format.
CLS621 User Manual is available here: File:Cls621-631uman.pdf
Drivers and Utilities
Up to date Drivers and Utilities can be found at the Citizen Support Site
CLP Series Windows Driver Citizen_7.1.5_M-2 File:Citizen 7.1.5 M-2.exe VuePrint Utility File:Vue Print Utility Installer.exe
Print Code
Print code for the printer is generated using the language described by the [Command Reference Manual] Printing origin is at the bottom left of label, all measurements are made from here. Units are 0.01 inch or 0.1 mm.
Can set n for inch or m for millimeter positioning, but looks as though neither are specified here.
L
---Specifying printing contents setting start
D11
---Set Pixel Size
PI
--set print speed
SI
--set paper feed speed
H20
--set print density (thermal transfer amount)
1 2 1 1 000 0026 0010 STYLENUM
---system font 2 set in characters 2/5/6/7 (this font is 18 dots high by 10 dots wide by 2 dots space at 203 DPI and 27 dots high by 14 dots wide by 4 dots space for 300 DPI
1 e 3 1 015 0013 0010 BEXC00014
---code 128 barcode font set in characters 2/5/6/7
---digit 1 is printing angle (set to 1 for horizontal)
---digit 2 is bar code selection (E for code128 B)
---digit 3 is wide bar width (set to 3)
---digit 4 is narrow bar width (set to 1)
---digit 5/6/7 is bar code height (set to 015)
---digit 8/9/10/11 is row address, distance upward from origin (set to 0013)
---digit 12/13/14/15 is column address, distance rightward from origin (set to 0010)
1 2 1 1 000 0003 0010EXC00014
1 2 1 1 000 0031 0096DESCRIPTION1
---digit 1 is printing angle (set to 1 for horizontal)
---digit 2 is font selection (set to font 2)
---digit 3 is horizontal direction expansion rate (set to 1)
---digit 4 is vertical direction expansion rate (set to 1)
---digit 5/6/7 is expansion font selection (set to 000)
---digit 8/9/10/11 is distance upward from (set to 0031)
--digit 12/13/14/15 is distance rightward from (set to 0096)
1 2 1 1 000 0021 0096 DESCRIPTION2
1 2 1 1 000 0011 0096 DESCRIPTION3
1 2 1 1 000 0001 0096 $10,000.00
Q0001
E
---End label format mode and print label
Installation
1 Download the drivers here File:Citizen 7.1.5 M-2.exe and Save them to your desktop
2 Double click Citizen_7.1.5_M-2.exe and run the Installation Wizard
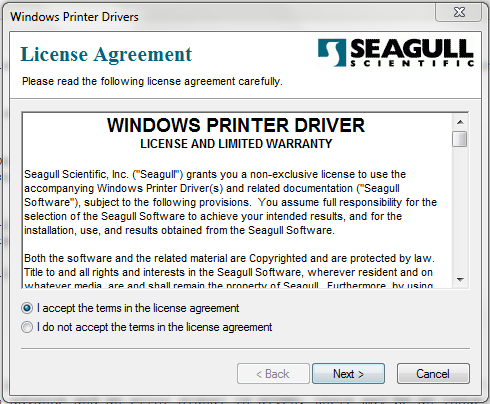
3 Accept the License Agreement and click Next
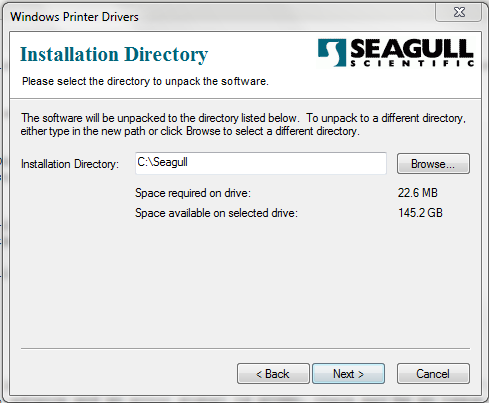
4 Accept the Installation Directory (C:\Seagull by default) and click Next
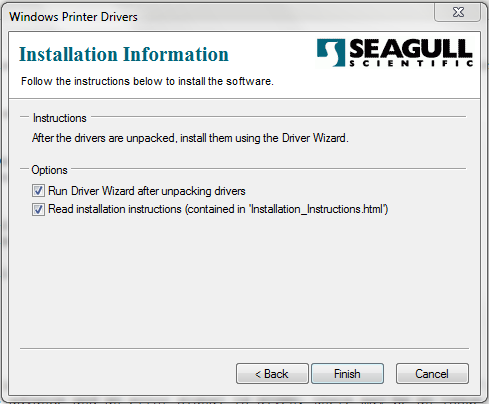
5 Click Finish to unpack the driver and launch the Setup Wizard
- Installation Instructions are displayed, use these as further reference
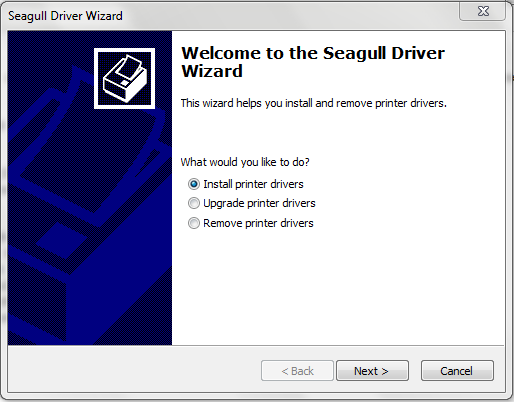
6 In the Setup Wizard, choose to Install a New Printer
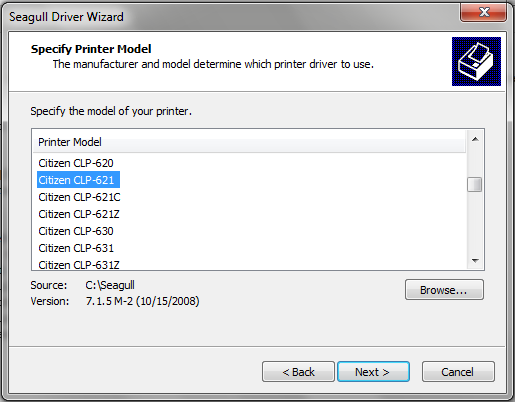
7 Choose your printer model (CLP621 in this case)
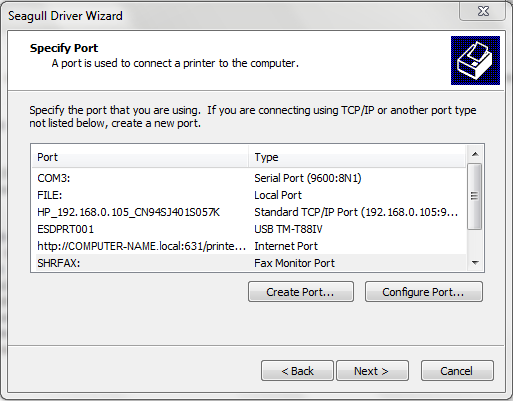
8 Choose the port you are installing on
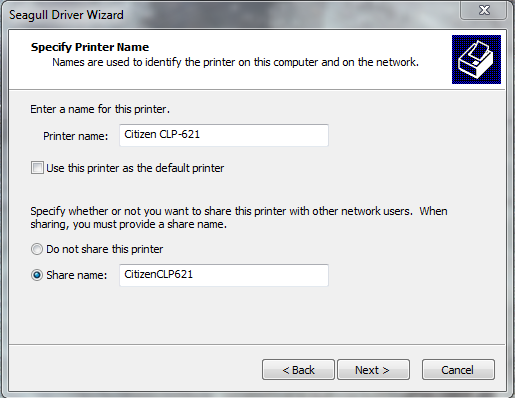
9 Choose to share the printer as CitizenCLP621
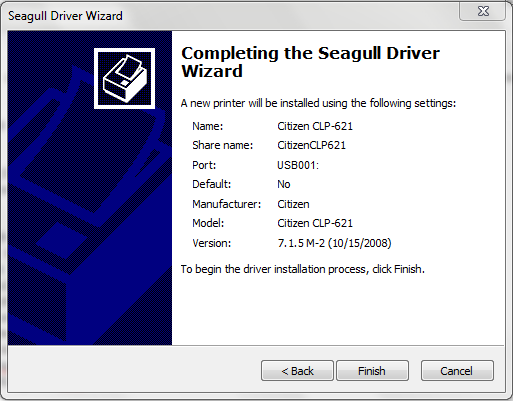
10 Review the settings and click Finish to install
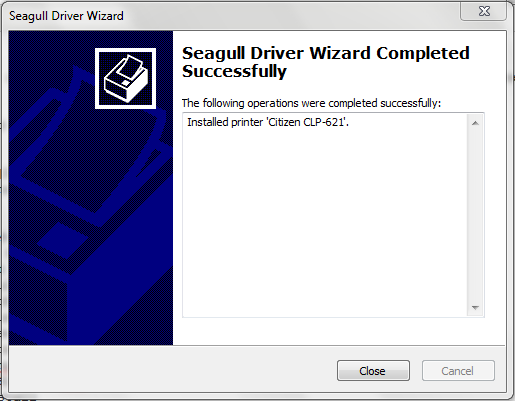
11 When the installation is complete, close the wizard
CLS621
The CLP621 has been replaced by the CLS621. The new model is capable of emulating various Datamax and Zebra languages, so is compatible with the Citzen tag printing in Executive provided it is properly configured to print the right language.
Factory defaults appear to set it to Zebra, so new CLS621 models may need to go through the following procedure:
1 Turn Power Off
2 Press Mode/Repeat key and Power On
3 Do you want to reset this printer to factory settings? Yes (Pause)
4 Do you want to print current menu settings? No (Stop)
5 Do you want to change the menu settings? Yes (Pause)
6 Do you want to change Global Config Menu? No (Stop)
7 Do you want to change Page Setup Menu Items? No (Stop)
8 Do you want to change System Setup Menu Items? Yes (Pause)
9 For this section of questions, select Pause for the first 9 or so, until you come to Emulation Select (after Control Code). Choose Change Value (Stop)
10 First should be DMI, choose Next Item (Stop)
11 Next should be DM4, choose Select (Pause)
12 It should now restart the printer in Datamax DM4 emulation mode. This should reinstall the driver on Win7 computers (especially if you've already installed the main Citizen CLS621 driver (not the C or Z variation)
13 Test printing and ensure it does not put on the warning light when sending print jobs anymore. Contact support if troubles persist.
Troubleshooting
Alignment Problems
Label Gap Sensor
The Label Gap Sensor is used to determine the length of each tag, and controls the advancement of tags. If printing or using the Form Feed button causes many tags to advance and an error signal is given, there may be an issue with the Label Gap Sensor alignment. To align the gap sensor, see page 40 of the File:CLP621 Manual.pdf or the Citizen FAQ Site.
